Some players are guilty of not moving their feet when they play. Instead, they reach or lean when trying to hit the ball. This is not good. When you reach or lean, you have far less control over the ball and are far more likely to make mistakes.
A confession. I am often guilty of this. I get lazy. I stand back on my heels, rather than the front of my feet. I reach for wide balls. I lean for balls played to my body. It’s a bad habit.
But when I do move my feet, making small adjustments to get in the right position, I play so much better.
To help me improve my footwork, I had some coaching a few years ago with Mark Mitchell, a former England international player and a top coach. He got me doing a drill, where I had to make small steps, either to the left or right, to try and get my body in the ideal position to play forehand attacks.
I liked the drill so much, I often use it in my own coaching sessions. It’s a great way to improve your footwork and to get into the habit of making small adjustments to get into the ideal position to play shots as best as you possibly can.
For your benefit, I will explain the training drill below. You can either watch the video demonstration or follow the diagrams and written explanations (or both!).
Small steps training drill
Explanation
If you watched the video, you will see that I used some masking tape. This is to help the player doing the drill know where to move to. It also helps the feeder place the ball consistently.
The drill is in five parts. Depending on your ability level, you may choose to focus on different parts. For example, parts 1 and 2 are easiest. Parts 3 and 4 are a little harder. Part 5 is much harder.
 Part 1
2 balls to tape, 1 ball to forehand
The first part of the drill is really simple. The feeder puts two balls between the tape, and then one ball towards the forehand side.
When the feeder puts the ball wide of the tape, the player has to make a small step, using both feet, play the shot and then move back again.
 Part 2
2 balls to tape, 1 ball to middle
The next part of the drill is similar, but this time the feeder puts two balls between the tape, and the third ball goes towards the middle.
Again, the player has to make a small step, moving both feet to get into a good position to play the shot.
Often players find moving in this direction a little harder, so you may need to spend more time doing this to get the footwork right.
 Part 3
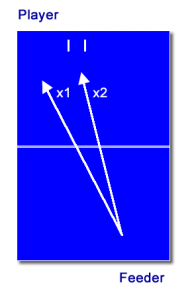
2 balls to tape, 1 ball to forehand, 2 balls to tape, 1 ball to middle
Now you put it all together. The feeder puts two balls between the tape, one ball to the forehand, two more balls to the tape and one ball to the middle.
You are really only playing on 2/3rds of the table, at most, but it’s still important to make these small steps to get into the right position. If you reach or lean, your shots won’t be anywhere near as good.
 Part 4
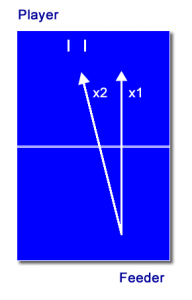
1 balls to tape, 1 ball to forehand, 1 balls to tape, 1 ball to middle
It’s time to speed things up a bit. Now the feeder only puts one ball between the tape. So one ball to the tape, one to the forehand, one to the tape, one to the middle and so on.
The player will now have to make a small step for every single shot.
This is harder work, so you really need to be on the front of your feet, ready to move all the time.
 Part 5
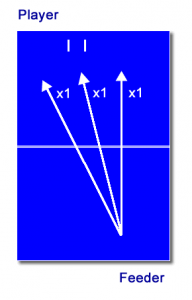
X number of balls to middle, 1 ball to either forehand or middle
This is where it gets much harder. The final part of the drill is random. The feeder plays to the tape any number of times and then plays a ball to either the forehand or middle, and then back to the tape again.
The player really has to watch the feeder’s bat to see where the ball is going, then make a quick small step, play the shot and move again for the next ball.
Most players I coach find this part of the drill very challenging.
Summary
All of those drills described above are for playing forehands, but you can easily do the same thing focusing on the backhand. You just need to move the tape to the backhand side of the table.
What I really like about this drill, is that it gets you into the habit of making small adjustments with your feet, even if the ball is played in this central zone. If you get into the right position, you’re going to find it so much easier to play better quality shots.
It’s something you really notice when you watch professional table tennis players. They are also moving their feet, always trying to get their body in the best possible position. This one of the reasons why they are so damn good!
Give the drill a try. Let me know if you find it helpful.